Here is a quick rundown of things that were fixed, and features that were added to Keyframe Animation in version 2.0.
- Fixed a bug that could cause SketchUp to crash if you undid the Save Position Data operation (Edit > Undo).
- Fixed the bug involving negative scale factors.
- Added support to interpolate reflections.
- Added support to interpolate inversions.
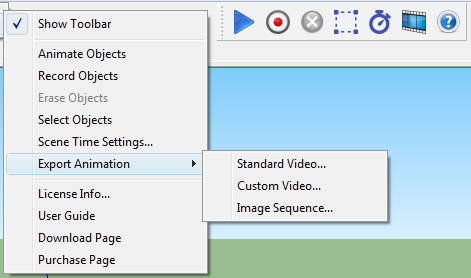
- Eliminated the tweens. Now you can export the object animation directly from the keyframe model.
- There are more export formats. For example, Animated GIF (.gif), Windows Media Video (.wmv), Microsoft MPEG-4 v2 (.avi), and Lossless (.avi).
- More export options too. The Frame Rate can go from 1 to 60 frames-per-second. The Frame Size can go from 8 x 8 to 3840 x 2160 pixels.
- A new Progress Bar makes the export process much more contolled and user friendly. It displays the time elapsed and the estimated time remaining. It keeps SketchUp responsive, and also allows you to stop exporting the animation at any point and resume it later.
- Removed restrictions on the type of camera. The object animation can be combined with SketchUp's animation of the Orthographic camera, Perspective camera, and Perspective camera Field of View.
- Removed restrictions on the scene properties. The object animation can be combined with SketchUp's animation of any of the scene properties and exported. It now plays nice with Hidden Geometry, Shadow Settings, Style and Fog, and Section Planes.
- The toolbar has a new Select Button that highlights all the objects that have position data saved on the current scene. This provides an easy way to tell if an object was recorded or not.
- The Record Button has a new workflow. If you don't select anything, it records all moving objects. Otherwise, it records the objects that were selected.


")


